skip to Main Content

I’m working on a Flutter project and need assistance with creating a container that has a curved outside border. I’ve attached a screenshot for reference enter image description here

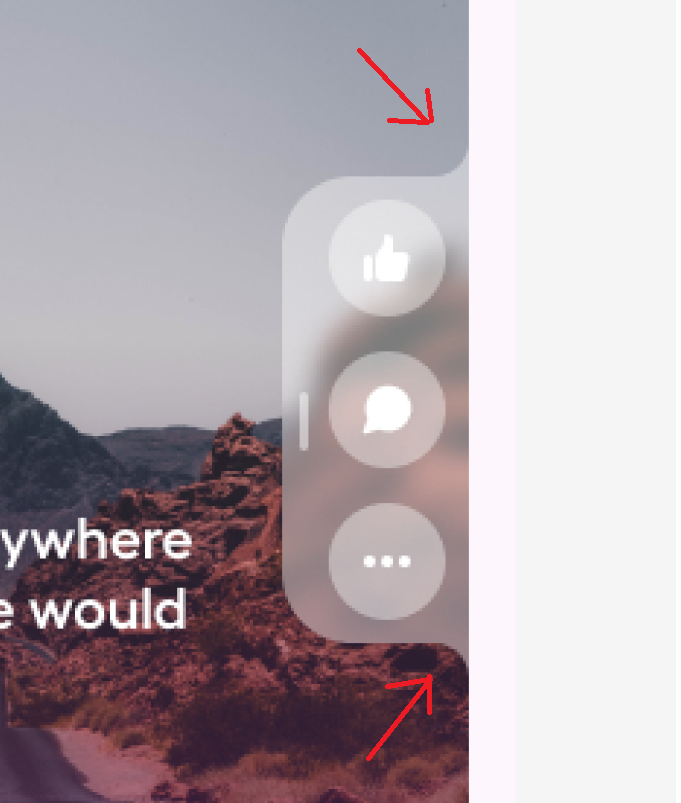
I have already attempted a few approaches, such as using the ‘BorderRadius’ class, but I haven’t been able to achieve the desired result. I would greatly appreciate any suggestions, code samples, or guidance on how to create a container with a curved outside border in Flutter. Thank you in advance for your assistance!

Here is my current code for this specific widget

Align(
            alignment: Alignment.centerRight,
            child: ClipRRect(
              borderRadius: const BorderRadius.only(
                topLeft: Radius.circular(15),
                bottomLeft: Radius.circular(15),
              ),
              child: BackdropFilter(
                filter: ImageFilter.blur(
                  sigmaX: 5.0,
                  sigmaY: 5.0,
                ),
                child: Container(
                  padding: const EdgeInsets.symmetric(vertical: 8, horizontal: 5),
                  decoration: BoxDecoration(color: ColorConstants.white.withOpacity(0.2)),
                  child: Row(
                    mainAxisSize: MainAxisSize.min,
                    children: [
                      Container(
                        height: 30,
                        width: 4,
                        margin: const EdgeInsets.all(4),
                        decoration: BoxDecoration(
                          color: ColorConstants.white.withOpacity(0.6),
                          borderRadius: BorderRadius.circular(20),
                        ),
                      ),
                      Column(
                        mainAxisSize: MainAxisSize.min,
                        children: [
                          _likeButton(),
                          _buttons(AssetsConstants.chat),
                          _buttons(AssetsConstants.more),
                        ],
                      ),
                    ],
                  ),
                ),
              ),
            ),
          )

2

Answers


  1. The easiest way is to use CustomPainter.Documentations

    You can use this website to generate the widget.

    Here is a simple solution I made using that website.
    enter image description here

    Custom Painter Code

    class CustomPainterBorder extends CustomPainter{
      @override
      void paint(Canvas canvas, Size size) {
      Paint paint0 = Paint()
          ..color = const Color.fromARGB(199, 81, 0, 255)
          ..style = PaintingStyle.fill
          ..strokeWidth = 1;    
        Path path0 = Path();
        path0.moveTo(size.width*0.2086333,size.height*0.2810143);  path0.cubicTo(size.width*0.2086583,size.height*0.3694286,size.width*0.2079083,size.height*0.4475143,size.width*0.2081667,size.height*0.5077143);    path0.cubicTo(size.width*0.2181667,size.height*0.5638429,size.width*0.2801667,size.height*0.4989286,size.width*0.2916667,size.height*0.5615714); path0.quadraticBezierTo(size.width*0.2918167,size.height*0.5466000,size.width*0.2922500,size.height*0.5030000);
        path0.lineTo(size.width*0.2907500,size.height*0.2787143);
    path0.quadraticBezierTo(size.width*0.2908167,size.height*0.2373571,size.width*0.2908333,size.height*0.2244286);  path0.cubicTo(size.width*0.2807833,size.height*0.2922429,size.width*0.2061417,size.height*0.2395286,size.width*0.2086333,size.height*0.2810143);
        path0.close();
        canvas.drawPath(path0, paint0);
      }
      @override
      bool shouldRepaint(covariant CustomPainter oldDelegate) {
        return false; // if you want to animate return true 
      }
      
    }


    Widget code

    child: CustomPaint(
      size: Size(100, 400), // Size([width],[height])
      painter: CustomPainterBorder(),
    ),
    
    Login or Signup to reply.
  2. You need to understand CipPath and Path and concepts like coordinate system, for shapes that are little or more complex.
    Drawing shapes is little complex initially. But once you get the hang of it, there are many benefits like most languages have common pattern and similar code, etc.

    I have created a demo app for you with your requirements.
    You need to play around with it.

    enter image description here

    Here is the code. Replace new flutter main.dart file code with the following code.

    import 'package:flutter/material.dart';
    
    void main() {
      runApp(const MyApp());
    }
    
    class MyApp extends StatelessWidget {
      const MyApp({super.key});
    
      // This widget is the root of your application.
      @override
      Widget build(BuildContext context) {
        return MaterialApp(
          title: 'Flutter Demo',
          theme: ThemeData(
            colorScheme: ColorScheme.fromSeed(seedColor: Colors.deepPurple),
            useMaterial3: true,
          ),
          home: const MyHomePage(title: 'Flutter Demo Home Page'),
        );
      }
    }
    
    class CustomContainer extends CustomClipper<Path> {
      @override
      Path getClip(Size size) {
        var path = Path();
        path.moveTo(size.width, 0);
        path.quadraticBezierTo(
          size.width,
          32,
          size.width - 32,
          32,
        );
        var leftMaxPos = size.width * 0.70;
        path.lineTo(leftMaxPos + 32, 32);
        path.quadraticBezierTo(
          leftMaxPos - 32,
          32,
          leftMaxPos - 32,
          96,
        );
        path.lineTo(leftMaxPos - 32, size.height - 96);
        path.quadraticBezierTo(
          leftMaxPos - 32,
          size.height - 32,
          leftMaxPos + 32,
          size.height - 32,
        );
        path.lineTo(size.width - 32, size.height - 32);
        path.quadraticBezierTo(
          size.width,
          size.height - 32,
          size.width,
          size.height,
        );
        path.close();
        return path;
      }
    
      @override
      bool shouldReclip(covariant CustomClipper<Path> oldClipper) {
        return false;
      }
    }
    
    class MyHomePage extends StatefulWidget {
      const MyHomePage({super.key, required this.title});
    
      final String title;
    
      @override
      State<MyHomePage> createState() => _MyHomePageState();
    }
    
    class _MyHomePageState extends State<MyHomePage> {
      @override
      Widget build(BuildContext context) {
        return Scaffold(
          appBar: AppBar(
            backgroundColor: Theme
                .of(context)
                .colorScheme
                .inversePrimary,
            // Here we take the value from the MyHomePage object that was created by
            // the App.build method, and use it to set our appbar title.
            title: Text(widget.title),
          ),
          body: Container(
            color: Colors.brown,
            height: MediaQuery
                .of(context)
                .size
                .height,
            width: MediaQuery
                .of(context)
                .size
                .width,
            child: Column(
              crossAxisAlignment: CrossAxisAlignment.end,
              mainAxisAlignment: MainAxisAlignment.center,
              mainAxisSize: MainAxisSize.max,
              children: [
                ClipPath(
                  clipper: CustomContainer(),
                  child: Container(
                    height: MediaQuery
                        .of(context)
                        .size
                        .height * 0.60,
                    width: MediaQuery
                        .of(context)
                        .size
                        .width * 0.60,
                    decoration: const BoxDecoration(
                      color: Color(0xC0FFFFFF),
                    ),
                    child: Column(
                      mainAxisAlignment: MainAxisAlignment.spaceEvenly,
                      crossAxisAlignment: CrossAxisAlignment.end,
                      mainAxisSize: MainAxisSize.max,
                      children: [
                        IconButton(
                          icon: const Icon(
                            Icons.thumb_up,
                            color: Colors.white,
                            size: 50,
                          ),
                          onPressed: () {},
                        ),
                        IconButton(
                          icon: const Icon(
                            Icons.maps_ugc,
                            color: Colors.white,
                            size: 50,
                          ),
                          onPressed: () {},
                        ),
                        IconButton(
                          icon: const Icon(
                              Icons.more_horiz,
                            color: Colors.white,
                            size: 50,
                          ),
                          onPressed: () {},
                        ),
                      ],
                    ),
                  ),
                ),
              ],
            ),
          ),
        );
      }
    }
    
    Login or Signup to reply.
Please signup or login to give your own answer.
Back To Top
Search