skip to Main Content

This is the UI that I aim to achieve

enter image description here

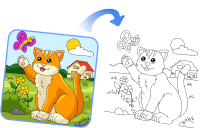
Hi everyone, I’m new to Flutter and i have a problem, How can I create a UI like the one in the image, consisting of two images connected by an arrow?
I’ve used the Positioned widget, but I’m unsure how to correctly position the arrow to match the design. Could someone help me with this? Thank you.

2

Answers


  1. You can do the following:

    • Use a Row to position your cards.
    • Rotate your cards using Transform.rotate.
    • Use a Stack and put the Row and the Image inside that.

    Result:

    enter image description here

    Code:

    class MySampleWidget extends StatelessWidget {
      const MySampleWidget({super.key});
    
      @override
      Widget build(BuildContext context) {
        const arrowSize = 50.0;
    
        return Scaffold(
          body: Padding(
            padding: const EdgeInsets.all(20),
            child: Center(child: LayoutBuilder(builder: (context, constraints) {
              final width = constraints.maxWidth * 0.4;
              return Stack(
                clipBehavior: Clip.none,
                children: [
                  Row(
                    mainAxisAlignment: MainAxisAlignment.spaceEvenly,
                    children: [
                      Transform.rotate(
                        angle: pi / 20,
                        child: Container(
                          width: width,
                          height: width,
                          decoration: const BoxDecoration(
                            color: Colors.red,
                            borderRadius: BorderRadius.all(Radius.circular(20)),
                          ),
                        ),
                      ),
                      Transform.rotate(
                        angle: pi / 20,
                        child: Container(
                          width: width,
                          height: width,
                          decoration: const BoxDecoration(
                            color: Colors.blue,
                            borderRadius: BorderRadius.all(Radius.circular(20)),
                          ),
                        ),
                      )
                    ],
                  ),
                  Positioned(
                    left: constraints.maxWidth / 2 - arrowSize / 2,
                    top: -arrowSize / 2,
                    child: Image.network(
                      'https://i.pinimg.com/564x/e1/dd/4a/e1dd4a304f0ad506a4dde90bf6d393f0.jpg',
                      width: arrowSize,
                    ),
                  ),
                ],
              );
            })),
          ),
        );
      }
    }
    

    Just use a better image for the arrow (transparent background).

    Login or Signup to reply.
  2. You can easily achieve this by using rows and columns or you can use stack widget as well.

    Here’s a solution using rows and columns:

    import 'package:flutter/material.dart';
    
    void main() {
      runApp(ColorBookApp());
    }
    
    class ColorBookApp extends StatelessWidget {
      @override
      Widget build(BuildContext context) {
        return MaterialApp(
          home: Scaffold(
            appBar: AppBar(
              title: Text('Color Book'),
            ),
            body: Center(
              child: Column(
                mainAxisAlignment: MainAxisAlignment.center,
                children: [
                  SizedBox(height: 50), // Add space for the arrow image
                  _buildArrowImage('assets/arrow.png'),
                  SizedBox(height: 20),
                  Row(
                    mainAxisAlignment: MainAxisAlignment.center,
                    children: [
                      _buildTiltedImage('assets/image1.jpg', -10),
                      SizedBox(width: 20),
                      _buildTiltedImage('assets/image2.jpg', 10),
                    ],
                  ),
                ],
              ),
            ),
          ),
        );
      }
    
      Widget _buildTiltedImage(String imagePath, double angle) {
        return Transform.rotate(
          angle: angle * 3.14 / 180,
          child: Image.asset(
            imagePath,
            width: 150,
            height: 150,
            fit: BoxFit.cover,
          ),
        );
      }
    
      Widget _buildArrowImage(String imagePath) {
        return Image.asset(
          imagePath,
          width: 50,
          height: 50,
          fit: BoxFit.cover,
        );
      }
    }
    

    Don’t forget to add your images inside your assets folder and also play with this to get your desired design

    Login or Signup to reply.
Please signup or login to give your own answer.
Back To Top
Search