skip to Main Content

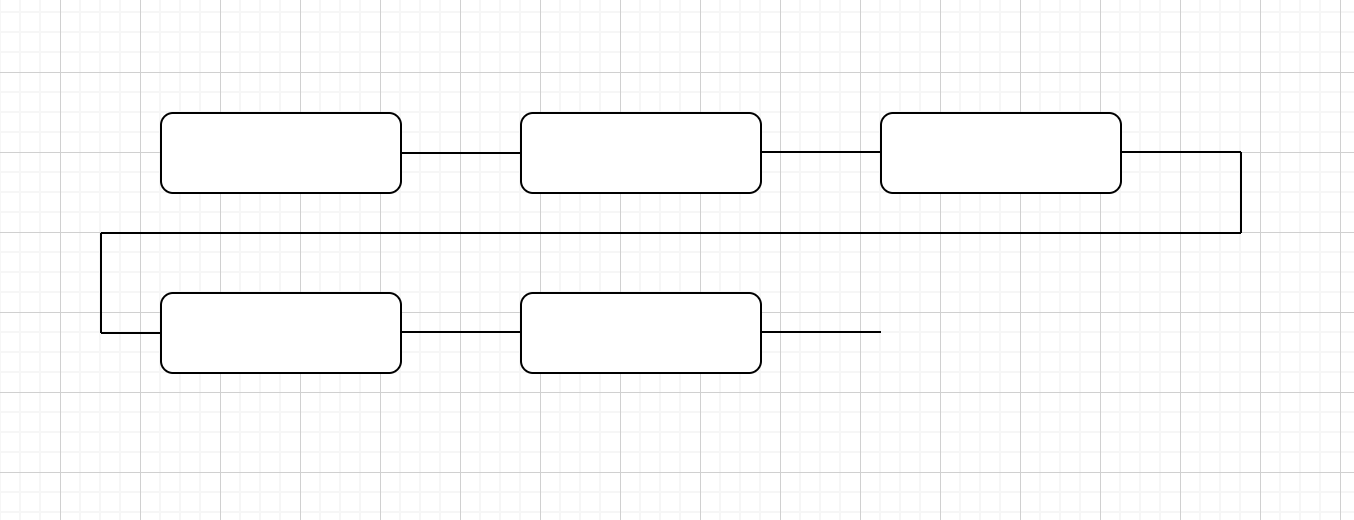
I am currently creating a repetetive horizontal chain like structure in HTML and CSS. I am able to wrap nodes to next row using flex-wrap but I am unable to insert connection line between 3rd node and 4th node.
How I can achieve something like following image? Thanks

Sample Design:

.wrapper-chain {
  display: flex;
  align-items: center;
  flex-wrap: wrap;
}

.nodeValue {
  width: 432px;
  text-align: center;
  cursor: default;
  border: 2.5px solid black;
  padding: 2px 10px;
  border-radius: 20px;
}

.line {
  width: 50px;
  border: 2px solid black;
  margin: 0px;
}
<div class="wrapper-chain">
  <div class="nodeValue">Node 1</div>
  <hr class="line" />
</div>

2

Answers


  1. Code bellow is a little untidy but I hope it will help you. The idea is to make transition to the new line each 3n child.

    (If you do responsible layout – it’s a bit pain, but if you do .nodeValue { width:21% } – will be solved)

    .wrapper-chain {
      display: flex;
      align-items: center;
      flex-wrap: wrap;
    }
    
    .nodeValue {
      flex: 1 0 21%;
      margin: 5px;
      width: 432px;
      text-align: center;
      cursor: default;
      border: 2.5px solid black;
      background: white;
      padding: 2px 10px;
      border-radius: 20px;
      position: relative;
      z-index: 1;
      margin-bottom: 15px;
    }
    
    .nodeValue::after {
      content: '';
      position: absolute;
      display: block;
      height: 1px;
      width: 100%;
      z-index: -1;
      background: black;
      right:-100%;
      top: 8px;
    }
    
    .nodeValue:nth-child(3n)::after {
      width: 1px;
      height: 10px;
      right: 5px;
      top: 22px;
    }
    .nodeValue:nth-child(3n)::before {
      content: '';
      position: absolute;
      display: block;
      height: 1px;
      width: 300%;
      z-index: -1;
      background: black;
      right:5px;
      top: 32px;
    }
    .nodeValue:nth-child(3n+1)::before {
      content: '';
      position: absolute;
      display: block;
      z-index: -1;
      background: black;
      width: 1px;
      height: 12px;
      top: -14px;
      left: 22px;
    }
    .nodeValue:last-child::after,
    .nodeValue:last-child:before {
      content: none;
    }
    <div class="wrapper-chain">
      <div class="nodeValue">Node 1</div>
      <div class="nodeValue">Node 2</div>
      <div class="nodeValue">Node 3</div>
      <div class="nodeValue">Node 4</div>
      <div class="nodeValue">Node 5</div>
      <div class="nodeValue">Node 6</div>
      <div class="nodeValue">Node 7</div>
      <div class="nodeValue">Node 8</div>
    </div>
    Login or Signup to reply.
  2. When your trying to render something that looks vector based , its often makes sense doing this in SVG.

    One big advantage of SVG’s, is that they scale automatically and look nice no matter the viewport.

    Seen as your filling this from an an array, it makes sense also generating the SVG in Javascript.

    Also one area of SVG’s in the browser that’s not often utilized is that there also dynamic, eg. If you later wanted to extend this so that when you click a node it gets hightled, that is pretty easy to do.

    Below is an example, click node to highlight.

    function createSvgElement(tag, attrs) {
        const e = document.createElementNS('http://www.w3.org/2000/svg', tag);
        if (attrs) Object.entries(attrs).forEach(([k, v]) => e.setAttribute(k, v));
        return e;
    }
    
    const items = new Array(4 + Math.trunc(Math.random() * 5)).fill('').map((v, ix) => `Node ${ix + 1}`);
    
    const itemHeight = 40;
    const itemWidth = 100;
    const itemPad = 50;
    const lineWidth = 3;
    const lineWidthD2 = lineWidth / 2;
    
    const rows = Math.ceil(items.length / 3);
    const cols = 3;
    
    let svg = createSvgElement('svg', {
        viewBox: `${-lineWidthD2} ${-lineWidthD2} ${lineWidth + itemPad * 4 + itemWidth * 3} ${lineWidth + itemHeight * rows + itemPad * (rows - 1)}`
    });
    
    let p = 0;
    for (let row = 0; row < rows; row++) {
        for (let col = 0; col < cols; col++) {
    
            const x = itemPad + (col * (itemPad + itemWidth));
            const y = row * (itemPad + itemHeight);
    
            const rct = createSvgElement('rect', {
                x, y,
                width: itemWidth,
                height: itemHeight,
                fill: 'white',
                stroke: 'black',
                "stroke-width": lineWidth,
                rx: 10, ry: 10
            });
            rct.style.cursor = 'pointer';
            svg.appendChild(rct);
    
    
            const txt = createSvgElement('text', {
                x: x + itemWidth / 2,
                y: y + itemHeight / 2,
                "dominant-baseline": "middle",
                "text-anchor":"middle",
                "font-family": "Arial, Helvetica, sans-serif",
                "font-size": itemHeight*0.6
            });
            txt.style.pointerEvents = 'none';
            txt.textContent = items[p];
            svg.appendChild(txt);
    
            if (col === cols -1 && row < rows -1) {
                const dropHeight = (itemPad+itemHeight)/2;
                const pth = createSvgElement('path', {
                    d: `
    M${x + itemWidth}, ${y + itemHeight/2}
    h${itemPad} v${dropHeight} 
    h${-(itemWidth+itemPad)*cols-itemPad}
    v${dropHeight} h${itemPad}
    `,
                    "stroke-width": lineWidth,
                    stroke: 'black',
                    fill: 'none',
                    "stroke-linejoin": "round"
                })
                svg.appendChild(pth);
            }
    
            p++;
            if (p >= items.length) break;
            
            if (col < cols - 1) {
                const l = createSvgElement('line', {
                    x1: x + itemWidth,
                    x2: x + itemWidth + itemPad,
                    y1: y + itemHeight / 2,
                    y2: y + itemHeight / 2,
                    stroke: 'black',
                    "stroke-width": lineWidth
                });
                svg.appendChild(l);
            }
           
        }
    }
    
    let lastRect = null;
    svg.addEventListener('click', e => {
        if (e.target.tagName === 'rect') {
            if (lastRect) lastRect.style.fill = 'white';
            e.target.style.fill = 'pink';
            lastRect = e.target;
        }
    });
    
    document.body.appendChild(svg);
    Login or Signup to reply.
Please signup or login to give your own answer.
Back To Top
Search