skip to Main Content

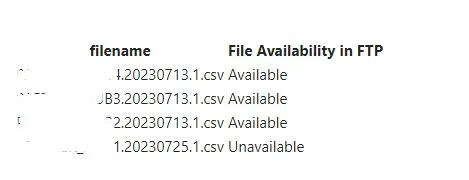
I have a requirement to display a table in mail. I have used ‘Create HTML Table’ activity in logic app and below is the result.

enter image description here

I want to add colors to alternative rows. Something like below.

enter image description here

Is there a way to customise the ‘Create HTML table’ activity in Logic app to increase the table size and add colors?

2

Answers


  1. You can do this using Logic apps. Use the following steps in the work flow :

    1. Receive the http request.
    2. Initialize the output as array with initial value of [].
    3. Initialize the sequence variable as integer.
    4. Enter in to a for loop.
    5. In the for loop, increment the sequence
    6. After incrementing, append to output array the value addProperty(items(‘For_each’),’S.No’,variables(‘Sequence’))
      What this does is add the S.No property to each JSON and append it to the new output array variable.

    Make sure you set the parallelism concurrency in the foreach loop to 1 so it runs sequentially else you will have weird sequence counts.
    enter image description here

    Your workflow will look like this.

    enter image description here

    The code version looks like this.

    {
    "definition": {
        "$schema": "https://schema.management.azure.com/providers/Microsoft.Logic/schemas/2016-06-01/workflowdefinition.json#",
        "actions": {
            "Create_HTML_table": {
                "inputs": {
                    "format": "HTML",
                    "from": "@variables('output')"
                },
                "runAfter": {
                    "For_each": [
                        "Succeeded"
                    ]
                },
                "type": "Table"
            },
            "For_each": {
                "actions": {
                    "Append_to_output_array": {
                        "inputs": {
                            "name": "output",
                            "value": "@addProperty(items('For_each'),'Sequence',variables('Sequence'))"
                        },
                        "runAfter": {
                            "Increment_Sequence": [
                                "Succeeded"
                            ]
                        },
                        "type": "AppendToArrayVariable"
                    },
                    "Increment_Sequence": {
                        "inputs": {
                            "name": "Sequence",
                            "value": 1
                        },
                        "runAfter": {},
                        "type": "IncrementVariable"
                    }
                },
                "foreach": "@triggerBody()",
                "runAfter": {
                    "Initialize_Sequence": [
                        "Succeeded"
                    ]
                },
                "runtimeConfiguration": {
                    "concurrency": {
                        "repetitions": 1
                    }
                },
                "type": "Foreach"
            },
            "Initialize_Sequence": {
                "inputs": {
                    "variables": [
                        {
                            "name": "Sequence",
                            "type": "integer",
                            "value": 0
                        }
                    ]
                },
                "runAfter": {
                    "Initialize_output": [
                        "Succeeded"
                    ]
                },
                "type": "InitializeVariable"
            },
            "Initialize_output": {
                "inputs": {
                    "variables": [
                        {
                            "name": "output",
                            "type": "array",
                            "value": []
                        }
                    ]
                },
                "runAfter": {},
                "type": "InitializeVariable"
            }
        },
        "contentVersion": "1.0.0.0",
        "outputs": {},
        "parameters": {},
        "triggers": {
            "manual": {
                "inputs": {
                    "schema": {
                        "items": {
                            "properties": {
                                "File": {
                                    "type": "string"
                                },
                                "File availability": {
                                    "type": "string"
                                }
                            },
                            "required": [
                                "File",
                                "File availability"
                            ],
                            "type": "object"
                        },
                        "type": "array"
                    }
                },
                "kind": "Http",
                "type": "Request"
            }
        }
    },
    "parameters": {}
    }
    
    Login or Signup to reply.
  2. You’re not going to like my answer but the simple answer is that if you want to have alternating coloured rows, then you’ll likely need to do it manually by looping through each record and creating the HTML table yourself manually.

    Email clients (typically) have limited functionality when it comes to CSS and Outlook is a prime example of that.

    I’ll give you an example of how you can apply CSS but the functionality for the alternating rows is, depending on your email client, unlikely to work.

    This is the basic test flow I put together …

    Flow

    This is the data I worked with to create the HTML table …

    Data

    From there, you’ll be well aware that the output of this step will produce a HTML table, but, the unfortunate part is, you’re unable to inject CSS classes into different elements so you can have tighter control over the formatting.

    A way to inject CSS though is to initialize a variable that contains the HTML before and after the output of the Create HTML Table step and simply include a style tag with the relevant CSS.

    HTML Body

    I’ve also included this piece of CSS …

    tr:nth-child(even) {
      background-color: #f2f2f2;
    }
    

    … and that’s the part you want to work but again, depending on your email client, it won’t take affect. However, once that’s written, you simply use it in your email body …

    Email

    … and this is how it comes out …

    Email Output

    … now, I understand that this doesn’t answer your question specifically relating to the alternating rows color but it shows how you can apply CSS to a table without specific class definitions.

    Again, if you want to do that, you’ll need to loop through much like this …

    Loop Flow

    The expression in the last step is …

    if(equals(variables('TD CSS Class (Temp)'), 'ODD'), 'EVEN', 'ODD')
    

    … and that would form the basis for your own self made HTML table. You’d need to put all the strings together to build each row (<tr>) and each field (<td>) within and then, like the first approach, your styling could look like this …

    <style>
        .ODD {
            background-color: #d4d2d2
        }
    
        .EVEN {
            background-color: #e3e3e3
        }
    </style>
    

    This is an example of the final HTML YOU would need to construct …

    <html>
    <head>
        <style>
            .ODD {
                background-color: #d4d2d2
            }
    
            .EVEN {
                background-color: #e3e3e3
            }
        </style>
    </head>
    
    <body>
        <table>
            <thead>
                <tr>
                    <th>Field1</th>
                    <th>Field2</th>
                    <th>Field3</th>
                </tr>
            </thead>
            <tbody>
                <tr class="ODD">
                    <td>Value 1.1</td>
                    <td>Value 1.2</td>
                    <td>Value 1.3</td>
                </tr>
                <tr class="EVEN">
                    <td>Value 2.1</td>
                    <td>Value 2.2</td>
                    <td>Value 2.3</td>
                </tr>
                <tr class="ODD">
                    <td>Value 3.1</td>
                    <td>Value 3.2</td>
                    <td>Value 3.3</td>
                </tr>
                <tr class="EVEN">
                    <td>Value 4.1</td>
                    <td>Value 5.2</td>
                    <td>Value 4.3</td>
                </tr>
                <tr class="ODD">
                    <td>Value 5.1</td>
                    <td>Value 5.2</td>
                    <td>Value 5.3</td>
                </tr>
            </tbody>
        </table>
    </body>
    </html>
    
    Login or Signup to reply.
Please signup or login to give your own answer.
Back To Top
Search