skip to Main Content

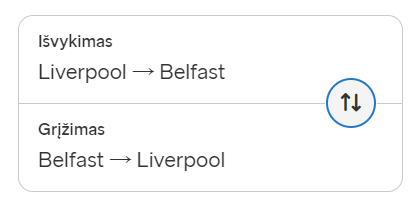
How can I create a layout similar to this one so that button is on two inputs?

Wanted layout

I have only this code and no idea how to make button attached to two inputs.

<!DOCTYPE html>
<html>
<head>
<title>Page Title</title>
</head>
<body>

<label>First</label>
<input type="text">

<br>
<input type="image" height="30" src="https://www.pngitem.com/pimgs/m/627-6274702_exchange-arrows-icons-png-clipart-png-download-exchange.png" />
<br>
<label>Second</label>
<input type="text">

</body>
</html>

3

Answers


  1. There are many different way to do this, but starting from what you’ve got, you could achieve the right position either with negative margins:

    <html>
    <head>
    <title>Page Title</title>
    </head>
    <body>
    
    <input type="text">
    <input type="image" height="30" src="https://www.pngitem.com/pimgs/m/627-6274702_exchange-arrows-icons-png-clipart-png-download-exchange.png" style="z-index:1;position:relative;margin-bottom:-20px;margin-left:-50px;"/>
    <br>
    <input type="text" />
    
    </body>
    </html>

    Or with relative positioning. It really depends on the context.

    <!DOCTYPE html>
    <html>
    <head>
    <title>Page Title</title>
    </head>
    <body>
    
    <input type="text">
    <input type="image" height="30" src="https://www.pngitem.com/pimgs/m/627-6274702_exchange-arrows-icons-png-clipart-png-download-exchange.png" style="z-index:1;position:relative;right:50px;top:20px;"/>
    <br>
    <input type="text" />
    
    </body>
    </html>

    For more on this, please read :
    Negative margins vs relative positioning

    I also strongly believe that in your picture these are not two inputs but rather two divs and in each div there is a label and an input from which the border has been removed.

    Hopefully this helps you to get started.

    Login or Signup to reply.
  2. <!DOCTYPE html>
    <html>
    <body>
    <style>
    .input-container {
      position: relative;
      width: 400px; 
    }
    
    .input-container div{
        border: 2px solid grey;
      display: flex;
      justify-content: space-between;
    }
    
    .input-container input{
      width: 80%;
      border: none;
      outline: none;
    }
    
    
    #button{
      position: absolute;
      right: 10%;
      top: 50%;
      transform: translate(0, -50%);
      border: none;
      background: transparent;
      z-index: 1;
    }
    
    </style>
    
    
    <div class="input-container">
    <div>
      <label>First </label>
      <input type="text" placeholder="input1">
    </div>
    <div>
      <label>Second</label>
      <input type="text" placeholder="input2">
    </div>
      <button id="button"><img height="20" src="https://www.pngitem.com/pimgs/m/627-6274702_exchange-arrows-icons-png-clipart-png-download-exchange.png" />
      </button>
    </div>
    
    
    </body>
    </html>
    Login or Signup to reply.
  3. As switch button, is for switching the values between two locations. You can use input type radio button and use button as a switch for switching the values. Here is an example:-

    const switchBtn = document.querySelector('.switch');
        const liverpool_to_belfast = document.querySelector('[value="liverpool_to_belfast"]');
        const belfast_to_liverpool = document.querySelector('[value="belfast_to_liverpool"]');
    
        switchBtn.addEventListener("click", () => {
          if (liverpool_to_belfast.checked) {
            liverpool_to_belfast.checked = false;
            belfast_to_liverpool.checked = true;
          } else {
            liverpool_to_belfast.checked = true;
            belfast_to_liverpool.checked = false;
          }
    
          // Test Value
          document.querySelectorAll('[name="location"]').forEach(btn => {
            if (btn.checked) {
              console.log(btn.value);
            }
          });
        });
    .parent {
          border: 1px solid gray;
          border-radius: 10px;
          width: max-content;
          height: max-content;
          display: flex;
          flex-direction: column;
          position: relative;
        }
    
        .child {
          padding: 1rem;
        }
    
        .child:first-child {
          border-bottom: 1px solid gray;
        }
        input[name="location"]{
           display: none;
        }
    
        .switch_parent {
          width: 100%;
          height: 100%;
          position: absolute;
        }
    
        .switch {
          border-radius: 50%;
          padding: 0.5rem;
          background-color: rgb(196, 196, 196);
          width: max-content;
          position: absolute;
          top: 50%;
          right: 5%;
          transform: translateY(-50%);
          cursor: pointer;
          user-select: none;
        }
     <div class="parent">
        <div class="child">
          <input type="radio" name="location" id="liverpool_to_belfast" value="liverpool_to_belfast" checked>
          <label for="liverpool_to_belfast">Liverpool &rarr; Belfast</label>
        </div>
        <div class="child">
          <input type="radio" name="location" id="belfast_to_liverpool" value="belfast_to_liverpool">
          <label for="belfast_to_liverpool">Belfast &rarr; Liverpool</label>
        </div>
        <div class="switch_parent">
          <div class="switch">
            <span>&uarr;</span>
            <span>&darr;</span>
          </div>
        </div>
      </div>
    • By default, the first input field (liverpool_to_belfast) is checked. So, the value is "liverpool_to_belfast" in the start.
    • In JavaScript, the code after the comment "Test Value" is for testing purpose only. As Radio button is hidden, so it will show updated Value in the console. You can remove it.
    Login or Signup to reply.
Please signup or login to give your own answer.
Back To Top
Search