skip to Main Content

Suppose I want to make a drawing that looks like this (pardon my bad drawing):

Line with multiple colors

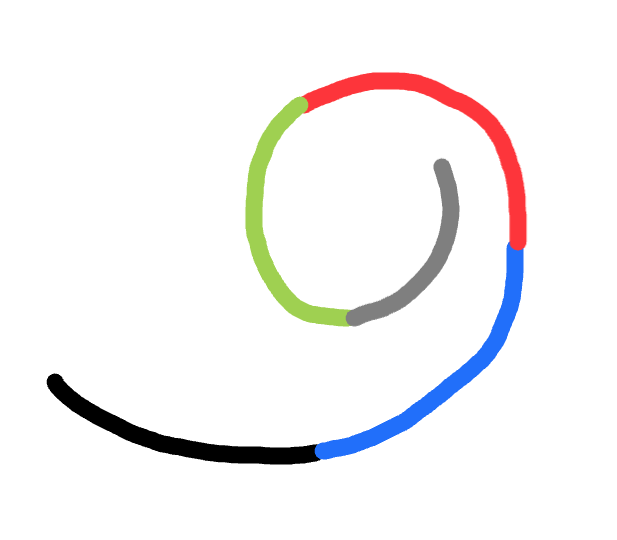
As you can see here, I want to make a line that has multiple colors on the line. What I did now is make a the line using UIBezierPath for the path and use CAShapeLayer to render the drawing. But I don’t know how to set the colors for the shape layer. Since the lines could have multiple colors, I’ve researched some answers but most of the answers that I found told me to create a CAGradientLayer and make the shape layer as a mask of that gradient layer like this (not the full code because some of them are confidential):

// This function is from a library we used.
import UIKit

struct CurvedSegment {
    var controlPoint1: CGPoint
    var controlPoint2: CGPoint
}

class CurveAlgorithm {
    static let shared = CurveAlgorithm()
    
    public func controlPointsFrom(points: [CGPoint]) -> [CurvedSegment] {
        var result: [CurvedSegment] = []
        
        let delta: CGFloat = 0.3 // The value that help to choose temporary control points.
        
        // Calculate temporary control points, these control points make Bezier segments look straight and not curving at all
        for i in 1..<points.count {
            let A = points[i-1]
            let B = points[i]
            let controlPoint1 = CGPoint(x: A.x + delta*(B.x-A.x), y: A.y + delta*(B.y - A.y))
            let controlPoint2 = CGPoint(x: B.x - delta*(B.x-A.x), y: B.y - delta*(B.y - A.y))
            let curvedSegment = CurvedSegment(controlPoint1: controlPoint1, controlPoint2: controlPoint2)
            result.append(curvedSegment)
        }
        
        // Calculate good control points
        for i in 1..<points.count-1 {
            /// A temporary control point
            let M = result[i-1].controlPoint2
            
            /// A temporary control point
            let N = result[i].controlPoint1
            
            /// central point
            let A = points[i]
            
            /// Reflection of M over the point A
            let MM = CGPoint(x: 2 * A.x - M.x, y: 2 * A.y - M.y)
            
            /// Reflection of N over the point A
            let NN = CGPoint(x: 2 * A.x - N.x, y: 2 * A.y - N.y)
            
            result[i].controlPoint1 = CGPoint(x: (MM.x + N.x)/2, y: (MM.y + N.y)/2)
            result[i-1].controlPoint2 = CGPoint(x: (NN.x + M.x)/2, y: (NN.y + M.y)/2)
        }
        
        return result
    }
    
    /**
     Create a curved bezier path that connects all points in the dataset
     */
    func createCurvedPath(_ dataPoints: [CGPoint]) -> UIBezierPath? {
        let path = UIBezierPath()
        path.move(to: dataPoints[0])
        
        var curveSegments: [CurvedSegment] = []
        curveSegments = controlPointsFrom(points: dataPoints)
        
        for i in 1..<dataPoints.count {
            path.addCurve(to: dataPoints[i], controlPoint1: curveSegments[i-1].controlPoint1, controlPoint2: curveSegments[i-1].controlPoint2)
        }
        return path
    }
}

func createLineDrawing(points: [CGPoint], colors: [CGColor]) {
        self.curveBezierPath = createCurvedPath(points)
        
        let gradientLayer: CAGradientLayer = createGradientLayerWithColors(colors: colors)
        gradientLayer.frame = layer.bounds

        let shapeMask = CAShapeLayer()
        shapeMask.path = curveBezierPath?.cgPath
        shapeMask.strokeColor = UIColor.white.cgColor
        shapeMask.fillColor = UIColor.clear.cgColor
        shapeMask.lineWidth = somelineWidth

        gradientLayer.mask = shapeMask
    }

The result of this code is not what I want to achieve, because the colors of the line will move vertically and don’t follow the line’s path like the example drawing above. Is there any other way to achieve this? I want to keep using the UIBezierPath to achieve the smoothness of line edges (because UIBezierPath has the addCurve method).

TLDR; Is there anyway to set multiple colors to a CAShapeLayer without using CAGradientLayer as the background of the shape layer (also the shape layer as the mask of that gradient layer)?

2

Answers


  1. enter image description here
    If this is what you’re looking for..

    One way to achieve this is by splitting the UIBezierPath into segments and drawing each segment using a separate CAShapeLayers.

    However, splitting a UIBezierPath isn’t that straightforward…
    The most complex part is splitting the curves so that each next segment is the exact continuation of the previous segment to get a smooth drawing like the original one. You will need advanced knowledge of UIBezierPath and how it works etc.. Or, you can simply use the gist I shared…

    Here is the code (from the pic):

    class ViewController: UIViewController {
    
        override func viewDidLoad() {
            super.viewDidLoad()
    
            //Initialize UIBezierPath extension
            UIBezierPath.sp_prepare()
        }
    }
    
    class SolidColorLinesView: UIView {
    
        //Original shape, drawn in solid black
        let shape = CAShapeLayer()
    
        //Segment shapes, each draw in a unique color
        var segmentShapes = [CAShapeLayer]()
    
        override func awakeFromNib() {
            super.awakeFromNib()
            backgroundColor = .clear
        }
    
        func createOriginalPath() -> UIBezierPath {
            let shape = UIBezierPath()
            shape.move(to: CGPoint(x: 1, y: 394))
            shape.addCurve(to: CGPoint(x: 200, y: 258),
                           controlPoint1: CGPoint(x: 53.33, y: 372.33),
                           controlPoint2: CGPoint(x: 166.4, y: 314.8))
            shape.addCurve(to: CGPoint(x: 142, y: 1),
                           controlPoint1: CGPoint(x: 242, y: 187),
                           controlPoint2: CGPoint(x: 206, y: 3))
            shape.addCurve(to: CGPoint(x: 7, y: 118),
                           controlPoint1: CGPoint(x: 78, y: -1),
                           controlPoint2: CGPoint(x: 3, y: 13))
            shape.addCurve(to: CGPoint(x: 156, y: 202),
                           controlPoint1: CGPoint(x: 11, y: 223),
                           controlPoint2: CGPoint(x: 136, y: 229))
            shape.addCurve(to: CGPoint(x: 171, y: 76),
                           controlPoint1: CGPoint(x: 176, y: 175),
                           controlPoint2: CGPoint(x: 200, y: 106))
            shape.addCurve(to: CGPoint(x: 76, y: 94),
                           controlPoint1: CGPoint(x: 142, y: 46),
                           controlPoint2: CGPoint(x: 77, y: 54))
            return shape
        }
    
        func configShapeLayer(layer shapeLayer: CAShapeLayer, with path: UIBezierPath, color: UIColor = UIColor.black, width: CGFloat = 10) {
            shapeLayer.path = path.cgPath
            shapeLayer.strokeColor = color.cgColor
            shapeLayer.fillColor = UIColor.clear.cgColor
            shapeLayer.lineWidth = width
            shapeLayer.lineCap = .round
        }
    
        override func draw(_ rect: CGRect) {
            let originalPath = createOriginalPath()
            configShapeLayer(layer: shape, with: originalPath)
            if shape.superlayer == nil {
                layer.addSublayer(shape)
            }
    
            //Clear all old drawings
            segmentShapes.forEach({ $0.removeFromSuperlayer() })
            segmentShapes.removeAll()
    
            //Splits the original path into 5 parts (4 dividers).
            let segmentsToSplit: [CGFloat] = [0.2, 0.4, 0.6, 0.8]
            let colors: [UIColor] = [.red, .green, .yellow, .cyan, .magenta]
            let splitPaths = originalPath.split(segments: segmentsToSplit)
            for (index, path) in splitPaths.enumerated() {
                let layer = CAShapeLayer()
                segmentShapes.append(layer)
                configShapeLayer(layer: layer, with: path, color: colors[index], width: 4)
                self.layer.addSublayer(layer)
            }
        }
    }


    Gist: UIBezierPath+Superpowers

    ========

    If you want to draw gradient lines instead of solid colors, it will require a more complex approach (which might be less performant).. for example, iterate over "all" (or every 3-4) the points of the path and draw the pixels in a desired (interpolated) color you want. The lower you choose the pixel groups, the smoother will be the color gradient, though the less will be performance… so not recommended.

    Login or Signup to reply.
  2. enter image description here

    Try the below code

    //
    //  ToDo:  you need to save the points to persist the line.
    //
    import SwiftUI
    
    struct ColoredLineDrawingView: View {
        @State private var points: [CGPoint] = []
        @State private var colors: [Color] = [Color.red, Color.green, Color.blue]
        
        var body: some View {
            GeometryReader { geometry in
                ZStack {
                    Path { path in
                        if let firstPoint = points.first {
                            path.move(to: firstPoint)
                            for point in points {
                                path.addLine(to: point)
                            }
                        }
                    }
                    .stroke(LinearGradient(gradient: Gradient(colors: colors), startPoint: .leading, endPoint: .trailing), lineWidth: 5)
                    .background(Color.white)
                    .gesture(
                        DragGesture(minimumDistance: 0)
                            .onChanged { value in
                                let point = value.location
                                points.append(point)
                            }
                            .onEnded { _ in
                                points = []
                            }
                    )
                }
            }
        }
    }
    
    @main
    struct ColoredLineDrawingApp: App {
        var body: some Scene {
            WindowGroup {
                ColoredLineDrawingView()
            }
        }
    }
    
    Login or Signup to reply.
Please signup or login to give your own answer.
Back To Top
Search