I want to ask about Flatlist on React Native. How to make Flatlist if there are using TouchaleableOpacity and make a column. I want each of the TouchaleableOpacity can go to different Screen. Can we make it like that? Maybe make a function? Or something? Please i don’t have a clue :")
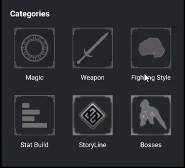
This is the result of Flatlist
This is my HomeScreen Code to make that flatlist on the Screenshot. As you can see, i just can make 1 TouchaleableOpacity and go to "BossScreen"
<FlatList
    data={categoryList}
    key={3}
    numColumns={3}
    keyExtractor={(item) => item.id}
    contentContainerStyle={styles.flatListContainer}
    showsVerticalScrollIndicator={false}
    renderItem={({ item }) =>{
        return(
            <TouchableOpacity
                style={styles.button}
                onPress={
                    () => navigation.navigate('BossScreen',{ categoryId: item.id })
                }
            >
                <Image
                    source={{uri:item.icon}}
                    style={styles.icon}
                />
                <Text style={styles.itemName}>{item.name}</Text>
            </TouchableOpacity>
        )
    }}
/>
This is my MainNavigator.js
        <NavigationContainer>
            <Stack.Navigator initialRouteName="MainScreen">

                <Stack.Screen
                    name="MainScreen"
                    component={MainScreen}
                    options={{
                        title: 'ArcanePedia',
                        headerStyle: {
                            backgroundColor: '#0074C4',
                        },
                        headerTitleStyle: {
                            color: 'white',
                            fontSize: 24
                        },
                        headerLeft: null,
                        headerTitleAlign: 'center',
                    }}
                />

                    <Stack.Screen
                        name="MagicScreen"
                        component={MagicScreen}
                        options={{
                            title: 'Magic',
                            headerStyle: {
                                backgroundColor: '#0074C4',
                            },
                            headerTitleStyle: {
                                color: 'white',
                                fontSize: 24
                            },
                            headerLeft: null,
                            headerTitleAlign: 'center',
                        }}
                    />

                    <Stack.Screen
                        name="FightingStyleScreen"
                        component={FightingStyleScreen}
                        options={{
                            title: 'Fighting Style',
                            headerStyle: {
                                backgroundColor: '#0074C4',
                            },
                            headerTitleStyle: {
                                color: 'white',
                                fontSize: 24
                            },
                            headerLeft: null,
                            headerTitleAlign: 'center',
                        }}
                    />

                    <Stack.Screen
                        name="WeaponScreen"
                        component={WeaponScreen}
                        options={{
                            title: 'Weapons',
                            headerStyle: {
                                backgroundColor: '#0074C4',
                            },
                            headerTitleStyle: {
                                color: 'white',
                                fontSize: 24
                            },
                            headerLeft: null,
                            headerTitleAlign: 'center',
                        }}
                    />

                        <Stack.Screen
                            name="StorylineScreen"
                            component={StorylineScreen}
                            options={{
                                title: 'StoryLine',
                                headerStyle: {
                                    backgroundColor: '#0074C4',
                                },
                                headerTitleStyle: {
                                    color: 'white',
                                    fontSize: 24
                                },
                                headerLeft: null,
                                headerTitleAlign: 'center',
                            }}
                        />


                        <Stack.Screen
                            name="StatsScreen"
                            component={StatsScreen}
                            options={{
                                title: 'Boss',
                                headerStyle: {
                                    backgroundColor: '#0074C4',
                                },
                                headerTitleStyle: {
                                    color: 'white',
                                    fontSize: 24
                                },
                                headerLeft: null,
                                headerTitleAlign: 'center',
                            }}
                        />

                        <Stack.Screen
                            name="BossScreen"
                            component={BossScreen}
                            options={{
                                title: 'Boss',
                                headerStyle: {
                                    backgroundColor: '#0074C4',
                                },
                                headerTitleStyle: {
                                    color: 'white',
                                    fontSize: 24
                                },
                                headerLeft: null,
                                headerTitleAlign: 'center',
                            }}
                        />


            </Stack.Navigator>
        </NavigationContainer>
I expecting i can still using Flatlist and make every "item" can go through on their screen.
Ps: I hope you guys can understand want i mean. Sorry for my english is not good :")


3
Answers
yes you can do that, in your catagoryList have a key value pair, eg. "screen: ‘MagicScreen’", … and then in your renderItem, just reference the key, eg.
If I understood correctly, you want to navigate to a screen based on the pressed component. However, we need to see categoryList to give precise answer, since its rendering flatlist based on that.
but if categoryList contains screenNames, solution would look somewhat like this:
u can change
based on which component requires item id
You can add a separate function called renderItem and call that into your renderItem in the FlatList ,
And change your FlatList component like this ,
Each TouchableOpacity in your FlatList will navigate to a different screen based on the item.id. Just make sure to update the screen names and parameters according to your actual screen components and requirements.